Deviation Actions
How I Art Doll - Materials
- Click here to go back to the Table of Contents -
1. Materials
Probably the most boring section of my guide, there’s almost no pictures, a lot of text, but you can make it through! These are tools you can use to create effectively.
My estimated cost of materials per doll is $30, but initial acquisition of materials will probably cost you a lot more. Some materials can only be bought in amounts larger than you’d need for one doll. If you want to make your first doll cheaply, let me suggest some options. You can take apart stuffed animals for parts, use faux fur blankets or coats. Buy faux fur scrap boxes for a nice variety of color that’s much cheaper than buying them separately. Ask someone you know if they have materials to spare(I got wire from my Dad and quilt batting from my Mom when I first started!).
Polymer Clay
A vinyl plastic clay that comes in two varieties, the most popular which you bake in your oven, and air dry. The nice thing about clay which you bake, is you can easily take breaks without worry of it drying out. I mostly use Sculpey Premo!, it's mid range in price, comes in many colors, and is slightly flexible which is good for durability. Cosclay is the best polymer clay for flexibility and durability, it is a rubber-plastic hybrid.
Back when I made my harlequin kitten dolls, I measured the amount of clay it took to make one face plus four paws. For size reference, they are about 7 inches tall and 10 inches long. I used around 1.3oz ~ 1.6oz, which means a 2oz bar of clay can be enough to make one doll.
Check the “11. Special Thanks to and Links to Helpful Resources” section for resources that can help you pick the right brand of clay for your needs. If you ever want to take your doll making to the next level, you can get into resin casting for easy duplication of your sculpts, plus resin is super durable and you can use transparency effects.
Armature
I suggest selecting your wire in person if you can, because when buying online you don’t always know how the wire will behave when bent. I’m not a wire expert, but I’ve bought a few wires that broke way too easily. If you can get your wire in person you can give it a few sharp bends back and forth to see if it breaks really easy.
My go to wire is 17 gauge aluminum. I sometimes use pipe cleaners for fingers, wrists on small dolls, and poseable ears. It is actually the most resistant to breaking out of all the wire I have! Wires of 19+ gauge seem to break too easily in my experience.
If you can get plastic ball and socket joints they will last a lot longer than wire, though they can be hard to find and have less range of motion. I often see other artists use a combination, plastic ball and socket for the neck and back, wire for the legs and tail. If you’re feeling especially creative and smart, you can make your own joints from scratch.
Stuffing
Also called polyfill. I like to use quilt batting because it comes in sheets, cut it into strips and easily wrap it around the armature. I also glue my batting down in some spots with hot glue, I want to make sure my dolls keep their shape over time. I also maybe obsess a little over shaping the muscles and structure at this step… It makes me satisfied to have an anatomically correct core.
Glue
Some artists attach the fabric on their dolls with hot glue instead of sewing….. please don’t do this. It won’t feel nice to hold or pet, and most likely you will see evidence of clumps. Spend a little extra time sewing so you can make something you’re really proud of and will last a long time. Hot glue is not the best for attaching fabric to clay, but if you are just starting out and that’s what you have, then use it!
Hot glue is what I use to flock wool. The edge usually looks pretty rough, so I flock a row of fur in front of it with the Aleene’s glue. I also use hot glue for filling wiggle room in the armature and attaching the armature to the head.
Aleene’s Clear Gel Tacky Glue is what I use to flock fur. It dries super slow so you have no rush to work, but you must be careful not to disturb your work before it dries.
Beacon Fabri-Tac is what I use to attach fabric/leather to the polymer clay pieces. It dries VERY FAST. If I’m feeling brave and speedy sometimes I use it to flock faux fur.
Judikins Diamond Glaze is designed to act just like resin, but is water based and easy to use. I use this for gluing cabochons to painted paper. Can be used elsewhere where you need an especially strong bond with precision application. I learned this from PixiePeddler!
White school glue is what I used for flocking fur when I first started into dolls, it holds strong, but reactivates with water.
Epoxy/Apoxy
Comes in 2 parts that you mix together, and once it sets up it's pretty permanent. I sculpt an indent into the back end of my clay feet, this is where the wire connects and I use epoxy to cement them together. I also use epoxy to anchor plastic horns onto the face.
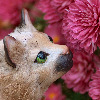
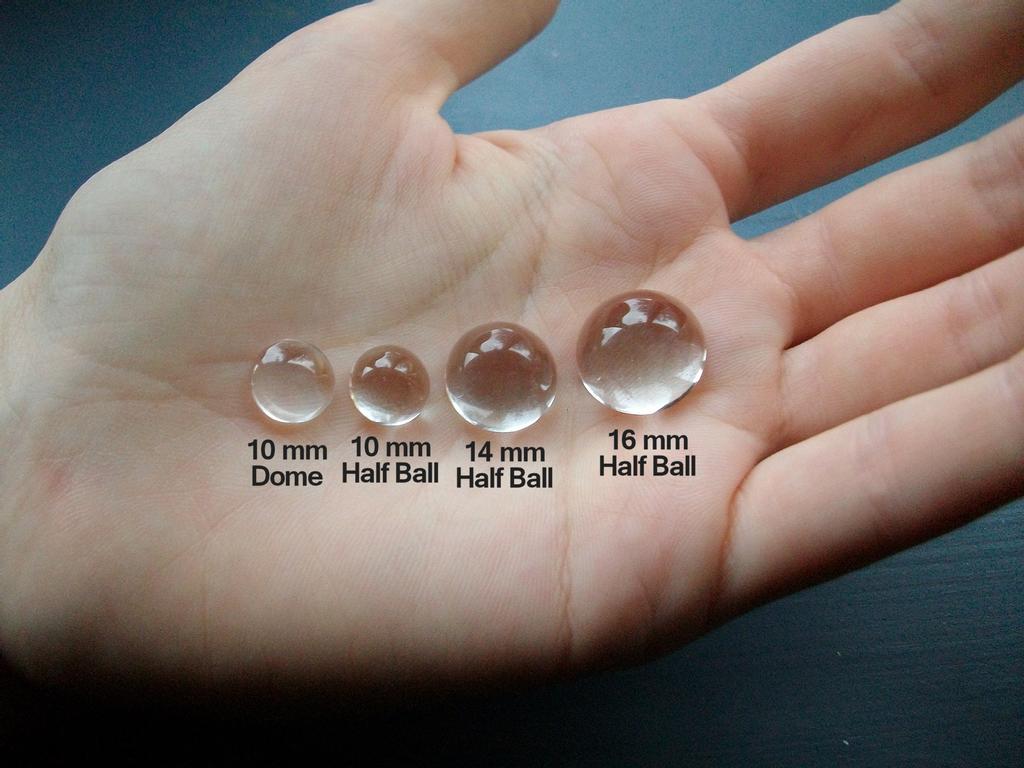
Cabochons
I mostly use glass cabochons for the eyes of my dolls for beautifully expressive eyes that follow you. Comes in different shapes, sizes, and types. Dome is flatter. Half ball(or half sphere) is higher and creates a stronger “follow me” effect. Both have a magnify effect. I tried some small plastic cabochons in the past that warped in the oven, so I suggest getting glass ones.


Fur or Fabric
Faux fur, real fur, scaley fabric, fleecy fabric, fuzzy fabric, whatever you want to cover your doll in! For a doll (like my third doll, the kitsune) 8 inch height, 9.5 inch long body, plus three 10 inch tails, I estimate a bit less than 1 yard of fur is used. Of course depending on how your pattern lays out, you may need less or more.
Here is my math: 75% of 9x11 inch yellow pelt + 75% of 9x11 inch blue pelt + 90% of 10x12 inch white pelt + 50% of 10x12 inch white pelt = 30.15 inches by 30.15 inches average - a bit less than 1 yard.
Paint and Paint Sealer
Some paints and sealers don't play well with polymer clay, seems the general safe rule is to stick with water based. Acrylic paint is good, enamel paints like nail polish will never cure and stay sticky forever. Some nail polishes are acrylic-which should be safe to use? Look for water based airbrush paints if you want to airbrush. Soft pastels(not oil pastels) can be used on polymer clay before or after baking.
If you are just making a doll for fun you do not need to worry about sealing the paint, but if you want to sell a good quality doll, it's a good idea to seal your work so it will last a long time. To find out what you can or can’t use, please check out this impressive and thorough testing on The Blue Bottle Tree website for compatible polymer clays and sealers: “Testing 41 Polymer Clay Sealers” by Ginger Davis Allman thebluebottletree.com/testing-… .
Make sure you stir your sealant well before each use!! I personally use DecoArt Media Ultra-Matte, Ace Water Based Satin Poly-Finish, and Rust-Oleum Ultimate Polyurethane Matte.
Thermoplastic
A moldable plastic that becomes soft at low hot temperatures(120+ degrees F). Create unbreakable delicate parts like horns and claws. Also good for adding bones to a wire armature for easier posing and limb stability. My favorite brand is Polly Plastics. Comes in pellets or sheets.
Tools
Clay sculpting tools - While not necessary, are extremely helpful, especially for details too small for your fingers. You can use things from around the house, but keep them as designated craft tools, do not use polymer clay tools with food.
Thread - I prefer upholstery thread to sew because regular thread breaks too often, especially when used on reinforced leather.
Scissors - I use short, really sharp scissors to trim my doll's fur, they are actually made for cutting fabric. Short scissors are easy to maneuver around small limbs. I've tried electric trimmers made for human hair which failed to vut rabbit fur because it is so fine. I need to try some cheap pet trimmers made for soft hair, I often hear them recommended for faux fur.
Balancing Weights - Glass gems, pebbles, rocks or sand work great for adding weight. If the doll's head is heavy I add a pouch of weight under the hips.
Foil - Bunch it up and use it as a core for your polymer clay face. You'll save on clay, and keep the thickness of your piece down, which will bake more evenly.
Masking tape/Painters tape - Can be used to hold fur out of the way while you sew. Fold over one end of the tape before use for easy removal later.
Large paint brushes - The bristles can be used for whiskers.
Airbrushing Supplies
I use a Master Airbrush TC-20T compressor, with a Master Airbrush Master Performance G222 Pro Set 0.2mm, 0.3mm, and 0.5mm nozzles. Make sure you’re getting a hose to connect the two. Cost me about $158 USD for that plus four 2oz bottles of paint. Automotive windshield fluid to clean out the airbrush, and a mask to keep particles out of your lungs.
Dedicated Surface for Polymer Clay
Polymer clay should not be used on things that come into contact with food, it can also stain things, so it is a good idea to have a dedicated work surface. You can lay out some tin foil, get a plastic cutting board, marble slab, glass slab, things like that. I also lay a piece of baking paper on the cookie sheet when baking to keep it clean.
Photo References and Sketches
As much as I see cats and rabbits everyday, it's difficult to sculpt one accurately from memory. That's where photo references come in. Making a full sized sketch of my doll helps me keep the proportions in check. A sketch is also useful to test out colors and markings.
Anything You Can Find
Gems, beads, trinkets, feathers, glitter, ribbons, buttons, interesting stuff in the hardware store intended for other uses… the world is your art supply! Hand sewn sequins or beads make stunning accents on a doll. Anything that won't melt in the oven can be stuck into polymer clay, if you're not sure, test it out in the oven first. I've used plastic beads in polymer clay without a problem so far, but I have had some plastic cabochons warp. Don’t forget to create accessories for your doll, it adds such a nice touch to their personality.
Click here to go back to the Table of Contents
4. Clay Parts
Art Markers
How I Art Doll - Airbrushing Fur
I DID IT!!!
This was a really informative post-well done :)